Merkle Trees

Intended audience: Solidity developers, blockchain engineers, and anyone interested in learning about Merkle trees.
Introduction
In this exploration, we're diving deep into the world of Merkle trees, a cornerstone concept in blockchain technology. Teaming up with Raza, a seasoned developer relations expert at Scroll, we aim to demystify the intricacies of Merkle trees and their profound impact on data verification and integrity. Let's get into the heart of blockchain data structures.
This article is a part of a series by Raza. He teams up with different specialists to write about a particular concept, based on a specific smart contract. For this article, we teamed up to write about Merkle trees.
To be clear, this is not a beginner tutorial level of stuff, you're jumping into the deep end. We dissect a smart contract, piece by piece, then roll up our sleeves and craft one ourselves. So if you want to level up your Solidity skills, let's dive in.
Previous articles in the series can be found here.
How to use this article
We look at a contract. Deconstruct it. Do some practise. Then we craft one ourselves. This article is not just for reading. You need to do the exercises or else it’s pointless.
Here’s what we’re going to do:
- Take a contract and understand what it’s aiming to do.
- Talk a bit about syntax if it hasn’t been covered by previous articles. These articles build on top of each other.
- Practise, Practise, Practise
- Then build the contract, based on a template with instructions
Why practising this smart contract is useful
Check out the Github Repo if you’re looking for a working example of the code.
Merkle trees allow you to cryptographically prove that an element is contained in a set without revealing the entire set.
That’s convenient, but how does that make it useful?
Surprisingly, there are many very practical reasons to use Merkle trees.
In its essence, Merkle tree can be used to verify any kind of data. It can help ensure that data blocks received from other peers in a peer-to-peer network are received undamaged and unaltered, and even to check that the other peers do not lie and send fake blocks. But there’s more to Merkle trees than just verification.
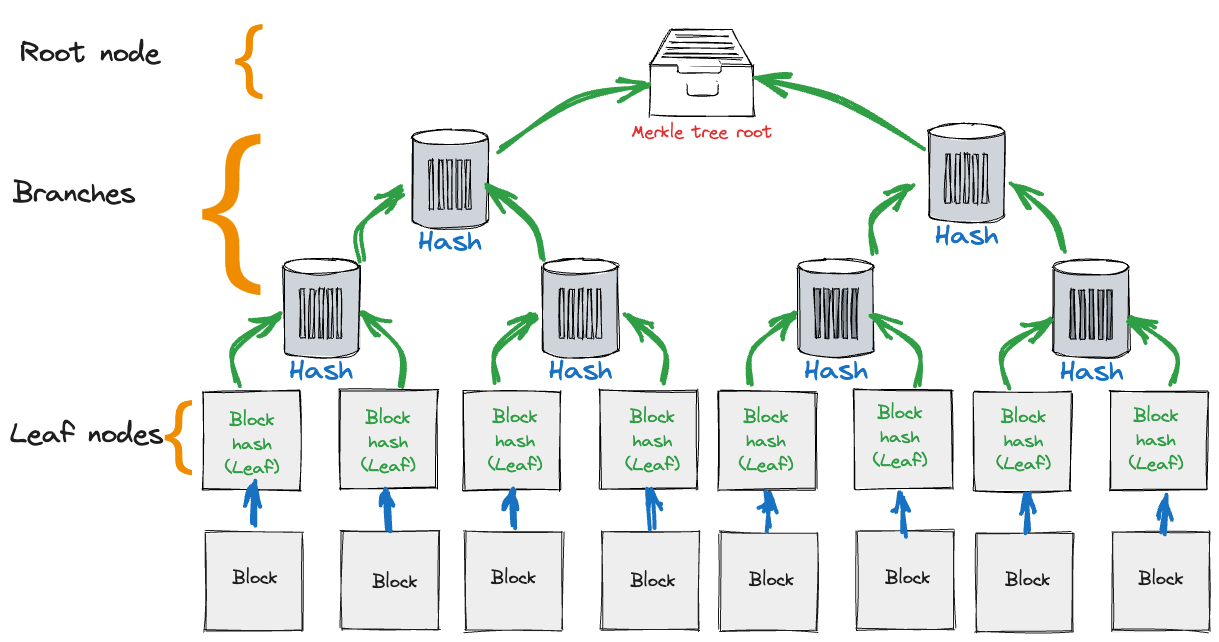
- Merkle proofs are used in blockchain networks like Ethereum to cryptographically verify large data sets. For example, they allow light clients to verify if a transaction is included in a block without downloading the entire blockchain.
- Smart contracts often use Merkle proofs to verify inclusion in various types of Merkle trees, like token whitelist Merkle trees for airdrops or allowlist Merkle trees for minting NFTs.
- Merkle trees provide an efficient way to store cryptographic hashes of data off-chain while still allowing easy integrity verification on-chain. Understanding Merkle proofs unlocks the ability to build schemas like this.
- Merkle proofs are a basic building block developers need to understand to build more complex smart contract systems or integrate with blockchain protocols. Getting solid experience with hand-crafting and verifying Merkle proofs develops this blockchain development intuition.
- While there are many Merkle proof code templates and examples, truly understanding how they work enough to build and debug custom implementations helps grow as a blockchain engineer.
In summary, familiarity with Merkle tree concept is essential for smart contract programming. It's one of basic building blocks of blockchain networks.
Now, let's dive deeper into details and see the contract.
The contract
What does the contract DO
The MerkleProof contract implements a method to verify that a leaf element is part of a Merkle tree given the root hash and a proof.
The verify() method takes in the Merkle proof (an array of hashes representing the sibling hashes along the path from the leaf to the root), the Merkle root hash, the leaf element hash, and the index of the leaf.
It then recalculates the Merkle root hash by hashing pairs of nodes up the tree according to the proof and index. If the recalculated root hash matches the provided root hash, it returns true, indicating the leaf is part of the Merkle tree with that root.
The TestMerkleProof contract demonstrates usage by constructing a simple Merkle tree of transaction hashes and providing a way to fetch the root hash and verify proofs.
In summary, this contract allows verifying that a leaf element is part of a larger Merkle tree given just the element, a proof, and the root, without needing the entire tree. This allows efficient cryptographic verification of partial dataset integrity.
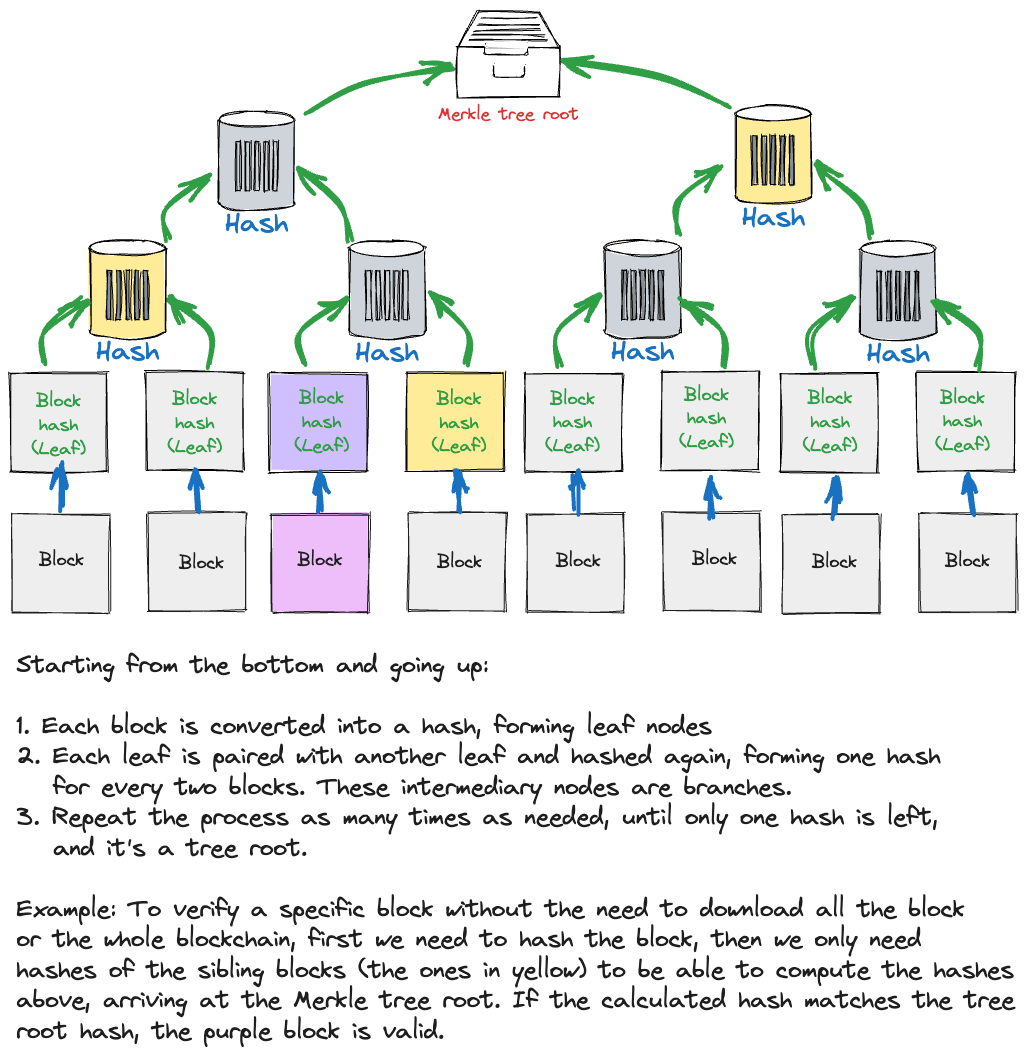
Here’s a visual example of going up the Merkle tree to verify one of the elements from the bottom:
Solidity syntax you should know
To fully understand and write the provided smart contract, you should be familiar with the following Solidity syntax and concepts:
- Data Types:
bytes32: A fixed-size byte array.uint: An unsigned integer.string: A dynamic-sized string type.string[4] memory: A fixed-size array of strings stored in memory.bytes32[]: A dynamic-sized array ofbytes32.bytes32[] memory: A dynamic-sized array ofbytes32stored in memory.
- Storage vs Memory:
storage: Persistent data storage on the Ethereum blockchain.memory: Temporary data storage that only persists during the execution of a function.
- Function Visibility:
public: The function can be called from any other contract or externally.pure: The function doesn't modify or read from the blockchain's storage.view: The function reads from the blockchain's storage but doesn't modify it.
- Contract Inheritance:
contract TestMerkleProof is MerkleProof: This indicates thatTestMerkleProofinherits fromMerkleProof.
- Control Structures:
for: Looping structure.if-else: Conditional branching.while: Another looping structure.
- Constructor:
constructor(): A special function that only runs once, when the contract is deployed.
- Built-in Functions and Global Variables:
keccak256(abi.encodePacked(...)): Hashes the provided arguments using the keccak256 algorithm.push(): Adds an element to a dynamic array.length: Retrieves the length/size of an array.
- Modifiers:
override: Indicates that the function overrides a function from a base contract.
- Events, Libraries, and Modifiers:
- Although these aren't used in the provided contract, they're commonly used in many other contracts.
- Mappings:
- A key-value store that allows you to associate one data type (the key) with another (the value). Not used in this contract but crucial for many others.
- Error Handling:
require(),assert(), andrevert(): Functions to handle errors and conditions, although they aren't used in this contract.
By understanding these syntax elements and concepts, you will be well-equipped to write and understand the given smart contract.
Breaking down the contract
MerkleProof contract
The MerkleProof acts as a parent contract and contains a single verify() function to verify Merkle proofs. This is used for verifying that a certain leaf node element of the Merkle Tree is valid with respect to a given proof.
This contract is rather minimal and serves primarily as a library for validating Merkle proofs.
Here’s a visual of the MerkleProof contract
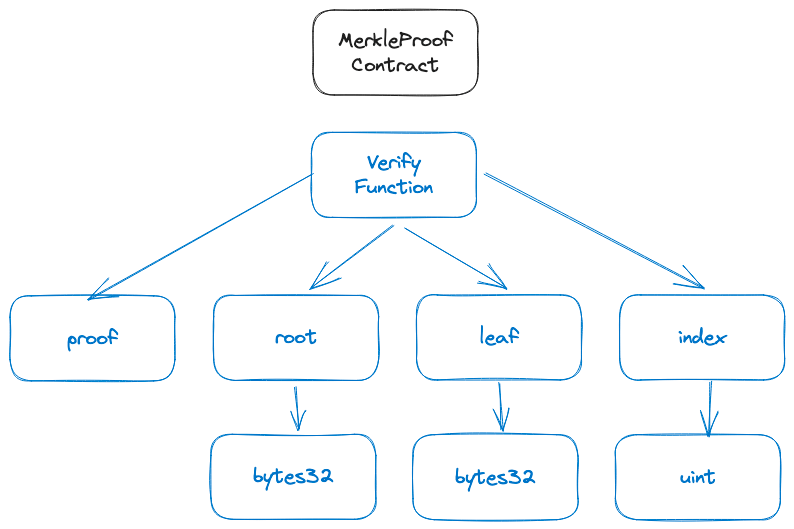
Let’s break down what the verify() function does.
verify() function
- Validates a Merkle proof
- Takes 4 parameters:
proof- array of proof nodes, which are intermediary hashes all the way to the top of the treeroot- Merkle root hashleaf- leaf node, an individual piece of data we’re trying to verifyindex- leaf index, a corresponding position of theleafwithin the Merkle tree.
- Computes hash of the
leaf - Uses
keccak256()to compute hashes - Iterates through proof nodes, combining with hash based on index being even/odd
- Iteratively hashes proof nodes (combining
leafnodes andproofelements), moving up the Merkle tree until it reaches the top - Checks if the calculated hashed value at the root of the tree matches the given
root - Returns
trueif final hash equalsrootand confirms that theleafexists within the given Merkle tree - Otherwise, returns
false, indicating that theleafisn’t part of the tree represented by theroothash.
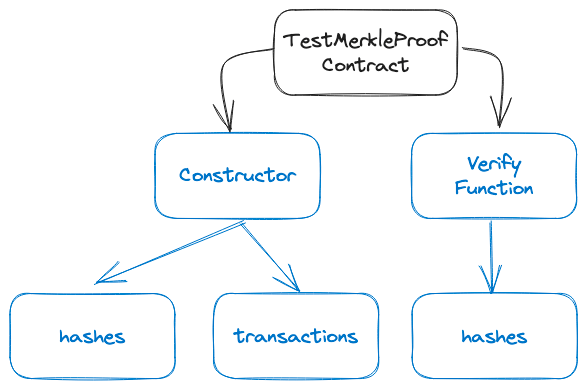
TestMerkleProof contract
- Shows how to construct a Merkle tree and provide the needed proof data to verify a leaf
- Together with
MerkleProofthey demonstrate a complete Merkle proof verification flow - Inherits
verify()fromMerkleProof constructor():- Builds a Merkle tree from some sample data
- Pushes leaf nodes
- Iteratively pushes parent nodes by hashing pairs of child nodes
getRoot()- Returns root node of Merkle tree stored in hashes
Here’s the visual of the TestMerkleProof contract
In summary
MerkleProofimplements proof verificationTestMerkleProofshows example of generating a Merkle tree- Hashes are computed using
keccak256() TestMerkleProofdemo includes sample proof data to verify against the tree- Together they demonstrate a complete Merkle proof verification flow.
Exercises
Here are 10 exercises that will test understanding and manipulation of Solidity's basics and more specific functionalities…
1. Basic Solidity Syntax and Structure
Exercise: Write a simple smart contract named HelloWorld that has a function greet which returns the string "Hello, World!".
Solution:
2. Memory Arrays and Loops
Exercise: Create a smart contract named ArrayManipulation that stores an array of integers. Add functions to add an integer to the array and to retrieve an integer at a specific index.
Solution:
3. Keccak256 Hash Function
Exercise: Write a function that accepts a string and returns its keccak256 hash.
Solution:
4. Working with Bytes32
Exercise: Create a function that accepts two bytes32 values, concatenates them, and returns the result.
Solution:
5. Conditional and Mathematical Operations
Exercise: Write a function that accepts two integers. If the first is even, return their sum; otherwise, return their product.
Solution:
6. Inheritance
Exercise: Create two contracts. The first, BaseContract, should have a function that returns "Base Function". The second, DerivedContract, should inherit from BaseContract and override the function to return "Derived Function".
Solution:
7. Memory Keyword
Exercise: Explain the difference between storage and memory in Solidity.
Solution:
In Solidity, storage refers to data that is stored on the blockchain and persists between function calls and transactions. Changes to storage are very costly in terms of gas. memory, on the other hand, refers to temporary data storage. It only persists during the execution of a function and is erased after the function completes. It's cheaper in terms of gas than storage.
8. ABI Encoding
Exercise: Write a function that takes in two integers, encodes them using ABI encoding, and returns the keccak256 hash of the encoded data.
Solution:
9. Understanding Merkle Trees
Exercise: Explain in your own words what a Merkle tree is and why it's useful in blockchain.
Solution: A Merkle tree is a binary tree where each leaf node is the hash of some data, and each non-leaf node is the hash of its children's hashes. This structure allows for efficient and secure verification of content in large sets of data. In the context of blockchain, it's used to verify if a particular transaction is part of a block without having to know all other transactions in that block.
10. Implementing Merkle Proof Verification
Exercise: Given a set of data, create a Merkle tree, and write a function that uses the Merkle proof to verify if a specific piece of data is part of the set.
Solution:
The provided smart contract MerkleProof at the beginning is an implementation of this. It creates a Merkle tree and provides a verification function to check the inclusion of a specific data in the tree.
By working through these exercises, you will gain a deeper understanding of the concepts and patterns used in the provided smart contract.
Final Task
Just like the last article, now we’re going to type up the contract. Below you will find a blank template with instructions. At this point, if you’re unclear how to write up a specific task, ask yourself what you don’t know. That’s your weak point and what you should be working on
Here’s a blank template with comments. Write it out.
Using Developer Tools
Most developers opt for JavaScript when deploying smart contracts. In this article we're using Hardhat to test the contract, but to deploy we'll use Truffle dashboard. Using Truffle dashboard prevents the need to pass our private keys! More on that later.
Hardhat
OK, let’s install hardhat and then use it to write some basic test and then deploy it. If you’ve never touched hardhat, no worries.
Install Hardhat
Hardhat is a popular development environment, testing framework, and asset pipeline for Ethereum. To deploy with hardhat, follow the steps below:
Install hardhat using npm:
You can run the following command to create a hardhat project:
Configure Hardhat
We’re going to use Truffle Dashboard with hardhat, what that is, I’ll show in a minute. Adjust your hardhat.config.js file like this:
Now you if you know a little bit dev tools, you might be asking, where do i pass the rpc url to deploy to a live network. Well you don’t have to. Let’s take a look. Side note, I am passing an rpc url in the hardhat: forking part. That’s for the testing part. Hardhat will fork the chain and simulate the transactions locally. This is handy if you’re interacting with contracts deployed on that chain.
Compiling the contract
So before we can deploy the contract, we need to compile it. Make sure to do a couple of checks, like the solidity the version in the contract should be the same as in the config file. Also make sure that the name defined inside the smart contract is the same as the name of the smart contract file.
Once you’ve done your checks, run the following command to compile the contract:
After compiling the contract you should have an artifacts folder inside your project.
Deploy
Normally you test first, then deploy. But if you’re starting out, you might not be interested in tests. So we’ll do deploying first and then dive into tests.
First make sure your deploy script refers to the right contract. You can find your script in the scripts and it’s usually called deploy.js. This is what the script looks like for the Merkle Proof contract:
Quick note, if you’re importing ethers in the following way, you might run in to an error.
That has to do with JavaScript versions. Hardhat uses CommonJS, whereas the above import statement is used in ESM (ECMAScript Modules) Projects. If you want to know more, check out this article. If you prefer using the import statement, it will require you to make some changes to your package.json and change the extension name of your deploy script file.
Next we’re going to need two windows in your terminal. In the first we run Truffle Dashboard, which spins up a local host server. In the second we will compile the contract and send it to the dashboard to deploy.
Before we start make sure you have truffle installed:
Next, spin up the dashboard.
Terminal 1: Run dashboard
Go to your browser (if it doesn’t pop up automagically) and the dashboard should be running on localhost:24012 or localhost:24013
Connect your wallet and connect to the network you want to use.
Terminal 2: Compile and send contract
Now when you run the above command, go to your dashboard and you should see the metadata of your contract. Make sure your wallet is connected and you’re on the desired network (probably a test net). Click deploy and that’s it!
It might look like your terminal is “stuck”, but it’s not. If your browser doesn’t pop up ‘auto-magically’, go to your localhost:24012 and then you should see a prompt to deploy the contract.
Test your contract
Tests basically run a function and check if the function returns the desired outcome. So you need to tell a test what function to run, the parameters (if any) and then what the desired outcome is. That’s it.
Here are some for this contract:
To run the test, use the following command in your terminal
And that’s it!
Next step in Ethereum scaling: Verkle trees
While Merkle trees have been a foundational component in the blockchain space, providing efficient and secure verification of content in large datasets, the evolution of technology never stops. Enter Verkle trees.
Verkle trees are a proposed data structure that combines Vector Commitment and Merkle Trie to produce a structure that is more efficient in terms of proof size and verification time than traditional Merkle trees. As the Ethereum network and other blockchain platforms continue to scale and seek optimizations, structures like Verkle trees are being explored to potentially replace or augment existing Merkle trees.
The significance of understanding Merkle trees, as we've delved into in this article, is that it provides a basis to appreciate the advancements brought by Verkle trees. Just as we've seen the power of Merkle proofs in ensuring data integrity and enabling light clients to interact with blockchains efficiently, Verkle trees aim to take this a step further. They promise to reduce the computational overhead on nodes and potentially lead to faster transaction times and lower fees.
In essence, our deep dive into Merkle trees not only equips us with a fundamental blockchain building block but also sets the stage for us to embrace and understand the next wave of innovations, like Verkle trees, in the blockchain space. As we continue our journey in blockchain development, it's essential to keep an eye on these emerging technologies and understand their roots (pun intended) in the foundational concepts we've already mastered.
If you like what you see, you'll find more stuff like this on my Twitter.
